HTML, CSS, batch commands, and Javascript examples that I have used in my library work. Short entries, designed as quick reference. By Len Davidson at CUA Law Library
Windows 10 has new tool that allows you to record macros and do repetitive tasks automatically:
Microsoft today announced that it is making Power Automate Desktop, its enterprise-level tool for creating automated desktop-centric workflows, available to all Windows 10 users for free. Power Automate Desktop is what Microsoft calls its “attended Robotic Process Automation” solution, but you can think of it as a macro recorder on steroids. It comes with 370 prebuilt actions that help you build flows across different applications, but its real power is in letting you build your own scripts to automate repetitive and time-consuming tasks.
CHKDSK (Check Disk) is the first Windows
diagnostic tool you should try if your PC starts acting strangely. For
example, if it hangs while shutting down or becomes frustratingly slow.
CHKDSK scans your entire hard drive to find and fix errors
in files and the file system itself. It also checks your drive for bad
sectors (clusters of data that cannot be read) and either tries to
repair them or tells your system not to use them.
Windows may run CHKDSK on startup if it detects a problem
with your hard drive, sometimes for innocuous reasons such as improper
shutdown, but also more serious ones including malware infection and
impending drive failure. However, it won’t actually fix any issues until
instructed to do so.
To prevent future errors and potential data loss, it’s worth
running CHKDSK manually at least once a month as part of your PC
maintenance routine. You can use one of the following methods:
1. Run CHKDSK through File Explorer
You can run CHKDSK from the command prompt. If you’re uncomfortable with using the Command Prompt, open File Explorer, click This PC, then right-click the drive you want to check and select Properties.
Select the Tools tab and then select Check in the Error checking section.
What Is the Difference Between CHKDSK, SFC, and DISM in Windows 10?
Confused about CHKDSK, SFC, and DISM? We look at the three Windows diagnostic tools and explain how they work in different ways.
When your PC starts reporting errors, slowing down, or
misbehaving, you can use Windows 10’s built-in diagnostic tools to try
and fix the problem. CHKDSK, SFC, and DISM check the health of your hard
drive and repair corrupt files, but the three tools work in different
ways and target different areas of your system.
CHKDSK, SFC, and DISM are system tools and you can run all
three. But this can prove time-consuming and unnecessary for your
specific problem. We’ll explain when and how to use this trio of
troubleshooting tools.
When You Should Use CHKDSK
CHKDSK (Check Disk) is the first Windows
diagnostic tool you should try if your PC starts acting strangely. For
example, if it hangs while shutting down or becomes frustratingly slow.
CHKDSK scans your entire hard drive to find and fix errors
in files and the file system itself. It also checks your drive for bad
sectors (clusters of data that cannot be read) and either tries to
repair them or tells your system not to use them.
Windows may run CHKDSK on startup if it detects a problem
with your hard drive, sometimes for innocuous reasons such as improper
shutdown, but also more serious ones including malware infection and
impending drive failure. However, it won’t actually fix any issues until
instructed to do so.
To prevent future errors and potential data loss, it’s worth
running CHKDSK manually at least once a month as part of your PC
maintenance routine. You can use one of the following methods:
1. Run CHKDSK through File Explorer
You can run CHKDSK from the command prompt. If you’re uncomfortable with using the Command Prompt, open File Explorer, click This PC, then right-click the drive you want to check and select Properties.
Select the Tools tab and then select Check in the Error checking section.
If Windows determines that everything is running smoothly,
it will suggest that you don't need to scan the drive. To run CHKDSK
anyway, select Scan drive.
The scan may take anything from a few minutes to half an
hour, depending on the size and state of your drive. Once complete,
CHKDSK will either tell you that no errors were found or if it does find
any, it will suggest you fix them.
CHKDSK ("check disk") is a Windows
diagnostic tool that scans data drive volumes, verifies their
integrity, and fixes errors when necessary. Here we highlight the
improved CHKDSK features you can find in Windows 8 and 10.
When You Should Use SFC
Whereas CHKDSK finds and fixes errors in the file system of your hard drive, SFC (System File Checker)
specifically scans and repairs Windows system files. If it detects that
a file has been corrupted or modified, SFC automatically replaces that
file with the correct version.
Knowing when to use SFC is usually more obvious than with
CHKDSK, which depends on a hunch that your hard drive isn’t behaving
correctly. If Windows programs are crashing, you’re getting error
messages about missing DLL files, or you’re experiencing the dreaded Blue Screen of Death, then it’s definitely time to run SFC.
Open an elevated Command Prompt, by running the tool as an administrator. Then type the following and press Enter:
sfc /scannow
SFC will perform a full scan of your system and repair and
replace any files that are damaged or missing, using versions from the
Windows component store. The scan can take some time, but make sure you
leave the Command Prompt window open until it’s complete.
If you only want to scan but not repair corrupted system files, type:
sfc /verifyonly command
Once SFC has finished scanning, you’ll see one of three messages:
Windows Resource Protection did not find any integrity violations. This means that whatever’s causing your PC problems isn’t related to a system file.
Windows Resource Protection found corrupt files and successfully repaired them. This should hopefully mean that your problems have been solved.
Windows Resource Protection found corrupt files but was unable to fix some of them. This means
that system files are to blame, but SFC can’t replace them. Try running
the tool again in Safe Mode. If you still get the same result, don’t
despair: it’s time to use DISM.
When You Should Use DISM
DISM (Deployment Image Servicing and Management)
is the most powerful of the three Windows diagnostic tools. Although
you shouldn’t usually need to use the tools, it’s the one to turn to
when you’re experiencing frequent crashes, freezes, and errors, but SFC
either can’t repair your system files or is unable to run at all.
While CHKDSK scans your hard drive and SFC your system
files. DISM detects and fixes corrupt files in the component store of
the Windows system image so that SFC can work properly. Create a backup of your drive partition before running DISM, just in case something goes wrong.
As with CHKDSK and SFC, you’ll need to open an elevated
Command Prompt to run DISM. To save you the time and risk of performing
repairs unnecessarily, you can first check if the image is corrupted
without making any changes. Type the following command and press Enter:
Dism /Online /Cleanup-Image /CheckHealth
The scan should only take a few seconds. If no corruption is
detected, you can run a more advanced scan to determine if the
component store is healthy and repairable, again without making any
changes, by typing:
Dism /Online /Cleanup-Image /ScanHealth
If DISM reports that there are problems with the system
image, run another advanced scan to repair these issues automatically.
DISM will connect to Windows Update to download and replace damaged
files as required. Note that the process may take up to 10 minutes and
hang for a while at 20 seconds, but this is normal. Type this command:
Dism /Online /Cleanup-Image /RestoreHealth
Once the scan and repairs are complete, restart your PC and
run SFC again to replace your corrupt or missing system files.
Fight Corruption and Win
Now that you understand what CHKDSK, SFC, and DISM do,
running one or more of these Windows troubleshooting tools will
hopefully help you fix your PC.
If you’re still having trouble, perform a System Restore.
This will restore your system files, settings, and programs to a time
when they were working properly. If your system wasn’t damaged when the
restore point was created, may solve your corruption problems.
You can now access your clipboard history in Windows 10:
To view your clipboard history, tap the Win+V keyboard shortcut. A little panel will open that will list all items, images and text, that you copied to your clipboard. Scroll through it and click an item you want to paste again.
If you look closely at the panel, you will see that each item has a little pin icon on it. Clicking it will exempt the item from being cleared when you clear your clipboard history. Speaking of which, you can clear your history by clicking the Clear all button on the clipboard history panel. You can also delete it from the Clipboard tab in the Settings app.
With
either location open in File Explorer, you can drag and drop
application shortcuts to configure these applications to launch when the
current user or all users log in. You don’t need any particular
permissions to drag application shortcuts into your own user-level
Startup Folder, but you’ll need admin rights and face a UAC prompt when
adding items to the All Users Startup Folder.
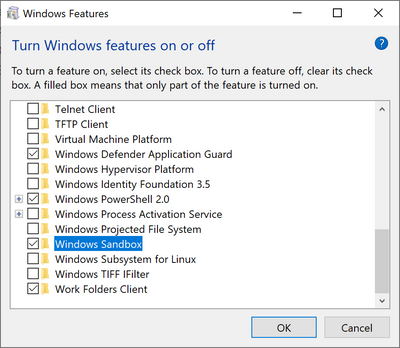
Windows Sandbox is a new lightweight desktop environment tailored for safely running applications in isolation.
How many times have you downloaded an executable file, but were
afraid to run it? Have you ever been in a situation which required a
clean installation of Windows, but didn’t want to set up a virtual
machine?
At Microsoft we regularly encounter these situations, so we developed Windows Sandbox:
an isolated, temporary, desktop environment where you can run untrusted
software without the fear of lasting impact to your PC. Any software
installed in Windows Sandbox stays only in the sandbox and cannot affect
your host. Once Windows Sandbox is closed, all the software with all
its files and state are permanently deleted.
Windows Sandbox has the following properties:
Part of Windows – everything required for this feature ships with Windows 10 Pro and Enterprise. No need to download a VHD!
Pristine – every time Windows Sandbox runs, it’s as clean as a brand-new installation of Windows
Disposable – nothing persists on the device; everything is discarded after you close the application
Secure – uses hardware-based virtualization for
kernel isolation, which relies on the Microsoft’s hypervisor to run a
separate kernel which isolates Windows Sandbox from the host
To quote TechNet,
the system file checker "scans and verifies versions of all protected
system files." It can tell you if it finds anything amiss if you enter SFC /scannow
at the command line. You must run this utility from an Administrator:
Command Prompt (press the Windows key-X combination), and then select
Command Prompt (Admin) from the resulting pop-up menu. This command
takes 5-10 minutes to complete, depending on your PC hardware. This
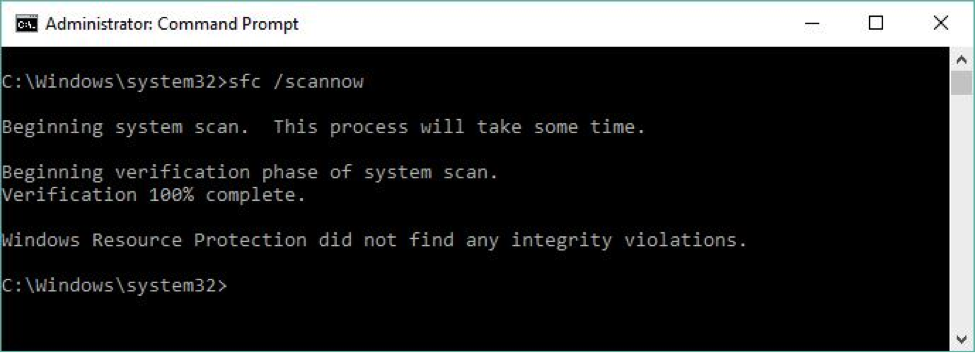
command also attempts repairs if it finds anything that needs it. Figure
1 shows some sample output.
Ed Tittel
Figure 1: When SFC finds a damaged file it attempts to replace it with a good copy.
If SFC determines that a protected file is damaged or changed, it grabs a correct version of the file from the C:\Windows\system32\dllcache
folder and replaces it with a good copy. SFC can even attempt to repair
that file cache if it finds changes or damage there, too. See the
TechNet SFC reference for complete information on this command.
But as repair tools go, SFC is fairly lightweight. DISM
is much more powerful and capable. DISM can often fix things that SFC
can detect but that it cannot itself fix. DISM supports a raft of
capabilities with switches and parameters to match, but basic system
file repair syntax is reasonably easy (though it often requires multiple
passes before it can set things straight). Here's some sample syntax
(consult the TechNet DISM Technical Reference for all the gory details):
dism /online /cleanup-image /checkhealth dism /online /cleanup-image /restorehealth [/Source: <source-info>]
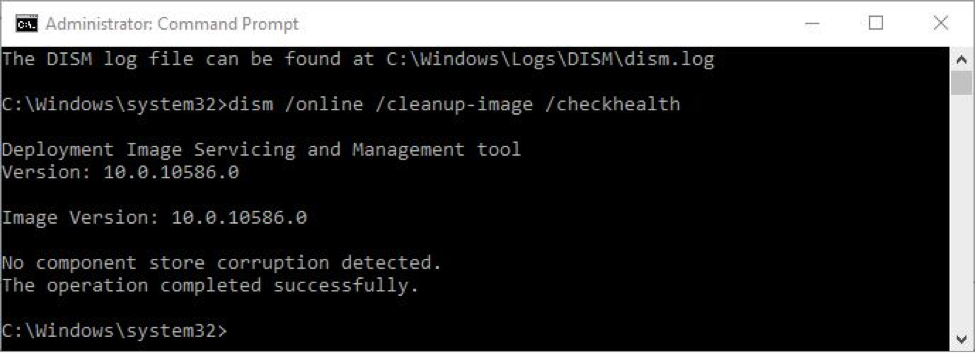
As with SFC, you must also run DISM in an Administrator: Command Prompt window. The /checkhealth command simply checks the running image (that's what /online
tells it to do) to see if it can detect any damage or corruption.
Because it's only checking file hashes and signatures, this command
completes in under one minute on most machines. The good thing about /check
is that it not only tells you if it finds damage but if that damage is
repairable or non-repairable. If it's repairable, you can proceed to the
/restorehealth option (covered in the next paragraph); if it's non-repairable, jump to Step 2.
Ed Tittel
Figure 2: Breathe a sigh of relief if DISM finds no corruption in the component store; otherwise try the /restorehealth option.
The /restorehealth command can be tricky to use. Because it
can actually repair the Windows image, it needs a source from which to
attempt such repairs. You can omit the /source option, but
if you do the command will try to grab its files from Windows Update
over the Internet. This may or may not work, depending on firewall
settings on your network. A safer bet is to point DISM at a known good
source for Windows image components on the local machine (or on your
local network). This can be a Windows image (.wim) file or a compressed Windows image (.esd,
which is used for electronic software downloads of Windows
installations, as the file extension is meant to communicate). You can
also point to a copy of a WinSXS folder (the usual directory path is C:\Windows\WinSXS) taken from another PC with similar or identical hardware for which dism … /checkhealth returns a clean bill of health.
Many stop errors can be fixed by updating Windows. In the search box on the taskbar, type Windows Update, then select Windows Update. On the Windows Update page, select Check for updates.
Driver updates for Windows 10 and many devices are downloaded and installed through Windows Update. To update or reinstall drivers, see the following support articles: Update drivers in Windows 10
Windows Defender periodically scans your device for potential problems. To see the results of the most recent scan, type “Windows Defender” on the search bar and select Windows Defender Security Center. Select Device performance & health. If there are problems with your device’s update history or drivers, they’re displayed here.
Here's how to help user with Windows 10 computer remotely through Quick Assist.
Five things to keep in mind before starting
1. Although Quick Assist works on all versions of Windows 10 (with the Anniversary Update installed), it's not available for older versions of Windows. If either computer uses an older version of Windows, both will need to use an earlier tool called Windows Remote Assistance instead.
2. Quick Assist is not a "set it and forget it" remote desktop tool. The person who needs assistance with their Windows 10 computer must be sitting in front of it -- at least initially, to grant permission for it to be connected and controlled by the computer of the person who will help them. In fact, we recommend that both parties be present at all times. Because the person providing assistance will have full access to the other computer and everything on it, a great deal of trust is involved; it can be more comfortable for both parties if that computer is never left unattended.3. Quick Assist works better if each Windows 10 computer has fast and reliable internet access. If you're the one controlling the other computer remotely, a flaky or slow connection can result in sluggish performance. For example, if you click to close an application window on the other computer, it may take several seconds to see this happening on your computer's screen.
Generally speaking, if you and the other person can hold a video chat session, such as through Skype, and the image and sound quality is good (especially at your end), then the connection your computers share is probably suitable for Quick Assist.
4. Quick Assist won't stream sound from the remote computer. This shouldn't matter, unless you're trying to fix an audio issue with the other computer.
Make the connection
Assuming that you will be the one who will control the other person's Windows 10 computer over the internet, here's how to get connected:
1. Launch the Quick Assist tool. It's listed under the Windows Accessories folder -- or just search the Start menu for "Quick Assist."
2. In the Quick Assist window that appears, click Give Assistance.
To help another Windows 10 user remotely, launch the Quick Assist app and choose Give Assistance. 3. Sign in with your Microsoft Online account. No longer required
4. Quick Assist generates a 6-digit security code. Give this code (by email, instant messenger, text or voice call) to the person whose computer you will need to connect to. After 10 minutes, this code will become invalid.
When you start a Quick Assist session, a 6-digit security code is generated for the person you are supporting to enter on their computer. 5. At the other end, the person who needs your help with their Windows 10 PC needs to launch the Quick Assist tool on their computer and click Get Assistance. Then they enter the 6-digit security code you gave them, and click Submit.
6. Next, they will be presented with a "Share your screen" permissions window, where they will need to click Allow.
The person you are assisting must give you permission to access their PC.
What you see, what they see
After a few seconds or more (this depends on the connection speed between the computers), Quick Assist will display the Windows 10 desktop of the other person's computer inside an application window, which will be bordered with a yellow frame.
When you're assisting someone else, you'll see their Windows 10 desktop inside a yellow frame. As with any other Windows desktop application, you can minimize this application window, maximize it to full-screen, move it around your desktop, or resize it by dragging its sides or corners. However, the desktop of the other person's computer always appears inside this application window; there's no option that lets you enlarge it to fill your own computer's screen.
To interact with the other computer, move your mouse pointer over the image of the other computer's Windows 10 desktop, and then just use your computer's keyboard and mouse (or touchpad) as you normally would when using your own computer.
From the point of view of the other computer, the person sitting in front of it will see that their Windows 10 desktop is framed by a yellow border. They will see the mouse pointer move as you control it from your computer, and they will also see the text and other characters you type from your computer's keyboard.
The person you're assisting will see their own desktop inside a yellow frame. As you move your mouse or enter text, they will see those actions on their desktop. They can still use their own computer's keyboard and mouse or touchpad, which will interfere with your actions if you're both doing this at the same time. If you plan to use Quick Assist to teach the other person how to do something on their computer -- for example, you perform an action remotely on their desktop, then watch as they repeat your action -- it's best to be on a phone call together so you can not only explain what you're doing, but also let them know when it's their turn to take control of their computer. (I wouldn't advise using Skype or another video streaming connection via the computers, because it sucks up bandwidth and could slow down Quick Assist.)
The person sitting in front of the other computer can temporarily pause your control over their computer at any time by clicking the "pause" icon next to "Screen sharing on" in the menu that appears at the top-center of their screen. When they click to pause, the yellow border framing their Windows 10 desktop turns gray. The pause icon will change to a triangle "play" icon, which they click when they want you to resume control over their computer.
The person at the remote computer can pause or end screen sharing at any time. They can also revoke your remote control of their computer by clicking the "X" next to "Quick Assist." This completely ends the session.
Q.Can anyone using the computer see the past activities listed in the Windows 10 Timelime?
A.The Timeline feature included with the Windows 10 April 2018 Update is meant to enhance your productivity by storing a record of the files you used, sites you browsed and other actions you made on your computer. Can’t remember where you stored a document or want to return to a particular website quickly? You can click the Timeline icon in the Windows 10 task bar to see a visual log organized by date, and jump back to what you need by clicking the appropriate preview icon.
If Timeline is enabled, some of your PC activity — like files you edit in Microsoft Office — can also sync with your mobile device or another computer you use. And the tool works with the Cortana virtual assistant and its “pick up where you left off” function, which restores your work space on command.
The activity data is recorded based on the Microsoft account, so if you share both the computer and the same user account, the Timeline records are visible to all involved. To keep your travels private, create a separate account for one of you to use. If you’d generally like to keep your activity private and do not want Windows 10 tracking it, you can turn off the Timeline feature, hide it or edit it.
Press the Windows and I keys to open the Settings box (or click the gear-shaped Settings icon in the Start Menu) and select the Privacy icon. On the left side of the Privacy box, select Activity History and turn off the box next to “Let Windows collect my activities from this PC” on the right side. If your computer was set to sync your activities with other devices online, also disable “Let Windows sync my activities from this PC to the cloud.”
If you eventually get separate accounts on the computer and one of you wants to use the Timeline feature, enable the data collection option in the Activity History controls again. In the “Show activities from accounts” area of the Settings box, flip on the switch next to the account wishing to use Timeline. Within the Activity History settings box, you can also wipe your activity history. To remove activities directly from the Timeline screen, right-click the thumbnail preview and choose the Remove or Clear option.
For those who find the feature useful and wish to use it, pressing the Windows and Tab keys opens the Timeline from the keyboard. You can also open Timeline by clicking its Taskbar icon next to the Cortana search box. Don’t see the Timeline icon? Right-click the Taskbar and choose “Show Task View Button.”
Go to File Explorer and hit the following path in the search address.
C:\Users\YourUsername\AppData\Local\Packages
Make sure you give your user account name in the path by replacing YourUsername with the user account name.
Hit Enter.
Search for Microsoft.MicrosoftEdge_8wekyb3d8bbwe folder and right-click on it.
Select Properties and uncheck the Read-Only option in the Properties window.
Click Apply and OK.
Search for Microsoft.MicrosoftEdge_8wekyb3d8bbwe folder. Right click
on it and delete. If you get the prompt saying “Folder Access Denied”,
click on continue. This will delete most of the content inside the
folder except AC folder.
Restart your computer.
To re-register your Microsoft Edge, search Windows PowerShell in Start menu.
In the search results, right-click on it and select Run as administrator.
In the PowerShell Window, type the following command and hit Enter.
Cd C:\Users\YourUsername
Make sure you give your user account name in the path by replacing YourUsername with the user account name.
These programs start up for all users. To open this folder, bring up the Run box, type shell:common startup and hit Enter.
Or to open the folder quickly, you can press WinKey, type shell:common startup and hit Enter.
You can add shortcuts of the programs you want to start with you Windows in this folder.
Resetting lets you choose whether to keep your files or remove them, and then reinstalls Windows. To get started, go to Settings > Update & security > Reset this PC > Get started and choose an option.
If you can't open Settings, you can get to reset by restarting your PC from the sign-in screen. Press the Windows logo key +L to get to the sign-in screen, then hold the Shift key down while you select Power > Restart in the lower-right corner of the screen. After your PC restarts, select Troubleshoot > Reset this PC.
If you can't get to the sign-in screen, use a recovery drive or installation media to reset your PC.
Option
What it does
Keep my files
Reinstalls Windows 10 and keeps your personal files.
Removes apps and drivers you installed.
Removes changes you made to settings.
Removes any apps your PC manufacturer installed. (If your
PC came with Windows 10, apps from your PC manufacturer will be
reinstalled.)
Remove everything
Reinstalls Windows 10 and removes all your personal files.
Removes apps and drivers you installed.
Removes changes you made to settings.
Removes any apps your PC manufacturer installed. (If your
PC came with Windows 10, apps from your PC manufacturer will be
reinstalled.)
If you're planning to donate, recycle, or sell your PC, use
this option and choose to fully clean the drive. This might take an hour
or two, but it makes it harder for other people to recover files you've
removed.
Restore factory settings
Reinstalls the version of Windows that your PC came with (either Windows 8 or Windows 8.1) and removes your personal files.
Removes apps and drivers you installed.
Removes changes you made to settings.
Reinstalls any apps your PC manufacturer installed on your PC.
Microsoft Edge no longer uses search providers you have to install
from Microsoft’s website. Instead, when you visit a web page that uses
the “OpenSearch” standard to expose its search engine information, Edge
notices this and makes a record of the search engine information.
This is the same way Google Chrome works, too—visit a web page with OpenSearch and Chrome will automatically detect it.
All you need to do is visit the search engine’s website to add that search engine to Edge. If you want to install Google, visit Google’s homepage. Once you’ve done so, you can make it the default using the instructions below.
Not every search engine supports OpenSearch yet, but we expect search engines will add support for this very quickly.
To change your search provider, click the menu button—that’s the
button with three dots at the top-right corner of the Microsoft Edge
window. Select “Settings” in the menu.
Scroll down in the “Settings” panel and click the “View advanced settings” button near the bottom.
Scroll down in the “Advanced settings” panel and you’ll see the
“Search in the address bar with” setting. Click the “Change search
engine” button.
You’ll see a list of available search providers. Select the search engine you want to use and click or tap “Set as Default”.
If the search engine you want to use doesn’t appear here, be sure
you’ve visited the search engine’s homepage first. If you have visited
the homepage and it still doesn’t appear, that search engine doesn’t
support OpenSearch yet. You may want to contact the search engine and
ask it to support OpenSearch so you can use it as your default search
engine in Microsoft Edge.
When you're browsing through your hard drive in File Explorer, most folders open quickly. However, the Downloads
folder, can take much longer to fully load.
The slow-loading Downloads folder problem occurs because, by default,
Windows is trying to create thumbnails for photos and videos in the
folder, even if none of the files are pictures. With a quick settings
change, you can make the Downloads folder open quickly in Windows 7, 8
or 10. Here's how.
1. Open File Explorer. You can get there by hitting Windows Key + E or clicking on the explorer icon in your taskbar.
2. Right click on the Downloads shortcut in the right window pane and select Properties.
3. Navigate to the Customize tab.
4. Select "General items" from the "Optimize this folder for:" list.
5. Click Ok.