HTML, CSS, batch commands, and Javascript examples that I have used in my library work. Short entries, designed as quick reference. By Len Davidson at CUA Law Library
Windows Sandbox is a new lightweight desktop environment tailored for safely running applications in isolation.
How many times have you downloaded an executable file, but were
afraid to run it? Have you ever been in a situation which required a
clean installation of Windows, but didn’t want to set up a virtual
machine?
At Microsoft we regularly encounter these situations, so we developed Windows Sandbox:
an isolated, temporary, desktop environment where you can run untrusted
software without the fear of lasting impact to your PC. Any software
installed in Windows Sandbox stays only in the sandbox and cannot affect
your host. Once Windows Sandbox is closed, all the software with all
its files and state are permanently deleted.
Windows Sandbox has the following properties:
Part of Windows – everything required for this feature ships with Windows 10 Pro and Enterprise. No need to download a VHD!
Pristine – every time Windows Sandbox runs, it’s as clean as a brand-new installation of Windows
Disposable – nothing persists on the device; everything is discarded after you close the application
Secure – uses hardware-based virtualization for
kernel isolation, which relies on the Microsoft’s hypervisor to run a
separate kernel which isolates Windows Sandbox from the host
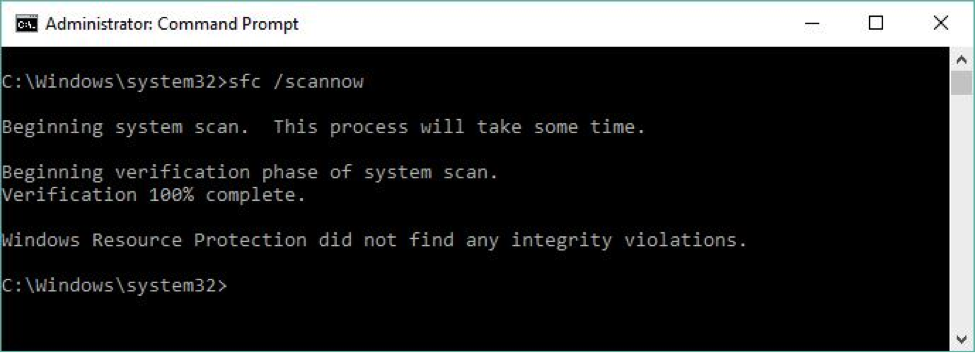
To quote TechNet,
the system file checker "scans and verifies versions of all protected
system files." It can tell you if it finds anything amiss if you enter SFC /scannow
at the command line. You must run this utility from an Administrator:
Command Prompt (press the Windows key-X combination), and then select
Command Prompt (Admin) from the resulting pop-up menu. This command
takes 5-10 minutes to complete, depending on your PC hardware. This
command also attempts repairs if it finds anything that needs it. Figure
1 shows some sample output.
Ed Tittel
Figure 1: When SFC finds a damaged file it attempts to replace it with a good copy.
If SFC determines that a protected file is damaged or changed, it grabs a correct version of the file from the C:\Windows\system32\dllcache
folder and replaces it with a good copy. SFC can even attempt to repair
that file cache if it finds changes or damage there, too. See the
TechNet SFC reference for complete information on this command.
But as repair tools go, SFC is fairly lightweight. DISM
is much more powerful and capable. DISM can often fix things that SFC
can detect but that it cannot itself fix. DISM supports a raft of
capabilities with switches and parameters to match, but basic system
file repair syntax is reasonably easy (though it often requires multiple
passes before it can set things straight). Here's some sample syntax
(consult the TechNet DISM Technical Reference for all the gory details):
dism /online /cleanup-image /checkhealth dism /online /cleanup-image /restorehealth [/Source: <source-info>]
As with SFC, you must also run DISM in an Administrator: Command Prompt window. The /checkhealth command simply checks the running image (that's what /online
tells it to do) to see if it can detect any damage or corruption.
Because it's only checking file hashes and signatures, this command
completes in under one minute on most machines. The good thing about /check
is that it not only tells you if it finds damage but if that damage is
repairable or non-repairable. If it's repairable, you can proceed to the
/restorehealth option (covered in the next paragraph); if it's non-repairable, jump to Step 2.
Ed Tittel
Figure 2: Breathe a sigh of relief if DISM finds no corruption in the component store; otherwise try the /restorehealth option.
The /restorehealth command can be tricky to use. Because it
can actually repair the Windows image, it needs a source from which to
attempt such repairs. You can omit the /source option, but
if you do the command will try to grab its files from Windows Update
over the Internet. This may or may not work, depending on firewall
settings on your network. A safer bet is to point DISM at a known good
source for Windows image components on the local machine (or on your
local network). This can be a Windows image (.wim) file or a compressed Windows image (.esd,
which is used for electronic software downloads of Windows
installations, as the file extension is meant to communicate). You can
also point to a copy of a WinSXS folder (the usual directory path is C:\Windows\WinSXS) taken from another PC with similar or identical hardware for which dism … /checkhealth returns a clean bill of health.
Had a patron with a new Android phone, was a bit stumped on how to get to the settings to customize the virtual keyboard.
Gboard is turned off on the Android launcher by default, so you have to get it by tapping on the ">" button (left of the top bar), then clicking on the "gear icon" get to settings
Access Gboard’s keyboard settings. Launch the Gboard app and tap "Keyboard Settings". A list of keyboard settings will appear.
Toggle Glide Typing. Glide typing is a feature that allows you to type words by sliding your finger from key to key without lifting it away from the keyboard. This feature is unique to google keyboard and will not appear in the iOS settings.
The toggle will turn blue when it is on, gray color indicates that it is off.
Toggle Emoji Suggestions. This feature recommends emojis in along with word suggestions as you type (e.g. typing the word ‘happy’ will suggest a smiley face in place of the word).
Toggle Auto-correction. This feature automatically changes misspelled words as you type. Keep an eye on names and places when this feature is turned on - they may not be recognized by the auto-correct dictionary and changed to something you don’t want.
Toggle Auto-capitalization. This will automatically capitalize words at the beginning of sentences as well as recognized proper nouns like names.
Question:
Until today, I was using Word 2003; now I am using Office 2016. I have (yes, literally) thousands, perhaps tens of thousands, of AutoCorrect entries that I want to transfer into Word 2016. Entering them all manually would be a massive undertaking. I know where to find the .acl file that they were stored in for Word 2003. My problem is where to find the corresponding file for Office 2016.
Secondarily, I'm hoping I can simply copy the old .acl file to a new location. If it's now in a different format, that becomes a second problem. But let's start with the question of where the new .acl (or other extension) file is now kept. Is anyone here able to answer that question, I hope?
Answer:
No, you can't rename your .acl file to use with the AutoCorrect template. You would have to run the equivalent program for Word 2003 from http://www.word.mvps.org/FAQs/Customization/ExportAutocorrect.htm in order to get a backup document in the correct format.
You may be able to substitute your 2003 .acl file for the one created by Office 2016. I don't think the file format has changed, but I'm not sure of that. It's worth a try, though.
With all Office programs shut down, start File Explorer. Type or paste into the address bar the path
%appdata%\Microsoft\Office
(The "environment variable" %appdata% automatically expands to the hidden AppData folder in your Windows profile.)
In the Office folder, you should see a file named MSO1033.acl, which is the AutoCorrect file for English (US). If your default language is something else, in the following instructions you must substitute the one with the correct locale ID number.
Move the MSO1033.acl file to a different folder, so you can move it back again if the procedure doesn't work.
Now copy the old .acl file into the Office folder, using the same name as the file you moved out.
Start Word and/or another Office program and look in the AutoCorrect Options dialog. If you see the complete list of entries that you expect, you're in luck. Otherwise, bring the original Office 2016 .acl file back into the Office folder and start adding entries the hard way.
Many stop errors can be fixed by updating Windows. In the search box on the taskbar, type Windows Update, then select Windows Update. On the Windows Update page, select Check for updates.
Driver updates for Windows 10 and many devices are downloaded and installed through Windows Update. To update or reinstall drivers, see the following support articles: Update drivers in Windows 10
Windows Defender periodically scans your device for potential problems. To see the results of the most recent scan, type “Windows Defender” on the search bar and select Windows Defender Security Center. Select Device performance & health. If there are problems with your device’s update history or drivers, they’re displayed here.
If you want to quickly disable dots for an app that you currently have a notification for, it's quite easy to do so. Drop the notification shade, find a notification from the target app and swipe it just slightly left or right — but not all the way — so that you get the settings cog for it but don't clear it out entirely. Continue by following the instructions here:
Customize every app through settings
If you don't have an outstanding notification currently and / or want to go in and edit notification dot permissions for a number of apps, you need to go the long way. Enter Settings and follow the steps below:
Disable them globally
If you don't like the notion of Notification Dots at all, just disable them globally. This is done pretty easy through Settings — here's how:
Perma.cc is a service that helps prevent link rot. Use it to preserve
the online sources you cite and to make those records accessible to your
readers.
Patron asked me if it is OK to use regular charger with new Quick charge Android phone: Yes
There are several types of rapid phone chargers. Some work by feeding the phone at a higher voltage (9 volts instead of the 5 volts put out by standard USB chargers). Others, such as the DASH system used by the OnePlus 3 smartphone in our ratings, keep the voltage at 5V but raise the amperage (4A vs. 2A for standard phone chargers).
But although the new phone chargers are built for speed, they default to a slower charging setting that's safe for all smartphones (5 volts at 500mA to 2A) when they sense they've been plugged into an unsupported device.
Qualcomm, which is known for its Snapdragon smartphone processors, is also behind the rapid-charging Quick Charge tech found in more than 100 smartphone models, including flagship phones from Samsung, Motorola, HTC, and others. (On some Motorola smartphones, Quick Charge is branded Turbo Charge.)
“There’s a lot of intelligence built into the charging process, with algorithms that help the adapter determine what the phone can take,” says Geoff Gordon, a marketing manager at the company.
It doesn't matter if that phone charger’s amp rating is higher than the one shown in your phone battery’s specs. The phone takes only the current it can handle. Consequently, when you plug a fast-charging phone into a conventional phone charger, it will charge at a slower rate.
Onboard microprocessors monitor and manage the battery’s state of charge and health to ensure that they get what they need at a rate they can handle. And that works across ecosystems. In other words, it makes no difference that iPhones use Apple’s lightning connector and Android phones use micro USB or the new USB Type-C connectors. If you plug the cable that came with your phone into the USB port of any phone charger, it should work safely.
To check if user is locked out of windows domain, there is freeware tool:
Account Lockout Status (LockoutStatus.exe) is a combination command-line
and graphical tool that displays lockout information about a particular
user account.
If you're ready to do a deep dive into photo editing, Pixlr Editor is a great choice. It has extensive features and offers many of the same powerful tools as Photoshop. You can perform numerous complex operations in Pixlr: working in layers for compositing or to finetune effects; using color correction and sharpening tools to make your subject pop; and superimposing text, shapes, and other elements onto your image for eye-catching originality and flair.The app comes in several different flavors: The web app, a free downloadable desktop app, a Chrome extension, and an online Express version that just lets you add quick Instagram-style filters, overlays, and stickers.
A free, open-source, image editor, the GNU Image Manipulation Program (GIMP) has been a go-to tool for Linux users for years, but has a reputation for being hard to use and lacking many of Photoshop’s features. The reality has changed dramatically over the last couple years. GIMP now has a very competent user interface, as well as an extensive and powerful set of features. Its openly extensible nature means that in some areas, like running well-known image processing algorithms on your photos, it actually outshines Adobe Photoshop. From extremetech
Got an RDP error, "This could be due to CredSSP encryption oracle remediation" There is easy fix, just change setting on remote PC:
Simply adjust the Remote Desktop settings on the host machine to a
lower security level. From File Explorer, choose Computer, right-click
and select Properties, then click Change Settings, and go to the Remote
tab.
From Windows 10, uncheck the option to “Allow connections only from
computers running Remote Desktop with Network Level Authentication
(recommended)”:
Autologon 3.01 Enables you to easily configure Windows' built-in autologon mechanism, so you don't have to wait on the login screen.
BIOS Master Password Generator
Collection of password generator tools to reset BIOS Power on Password /
Administrator password on Acer, Compaq, Dell, Fujitsu Siemens, Sony,
Hewlett Packard, Phoenix, Samsung and other generic brand Laptops.
BulletsPassView 1.25 Reveal the passwords stored behind the bullet (asterisk) characters in Windows / IE (Updated Asterisk Logger).
ClearLock 1.4.0
Lock your desktop with a transparent layer, allowing you to see what is
happening on your desktop and at the same time prevent access to the
computer without the proper password.
Router IP/Passwords
The complete list of Default Router Passwords and Default Router IP
Addresses, can be useful if you have misplaced the manual or lost your
router password.
SniffPass 1.13
A password monitoring tool that listens to your network, capture the
passwords that pass through your network adapter, it works on POP3,
IMAP4, SMTP, FTP, and HTTP protocols and recovers lost Web/FTP/Email
passwords.
WebBrowserPassView 1.30
Allows you to view the user names and passwords stored by Mozilla
Firefox, Opera, Safari, Google Chrome and Internet explorer Web
browsers.
WindowsGate 1.1 Enables/Disables Windows logon password validation.
Windows Product Key Update Tool 1.7
This tool is from microsoft to change the key of illegal/pirated
installed Xp to legit xp keys from the sticker on the PC, even if it is
oem and not retail/corporate.
WirelessKeyView 1.56 Recovers all wireless network keys (WEP/WPA) stored in your computer by WZC Wireless Zero Configuration.
Here's how to help user with Windows 10 computer remotely through Quick Assist.
Five things to keep in mind before starting
1. Although Quick Assist works on all versions of Windows 10 (with the Anniversary Update installed), it's not available for older versions of Windows. If either computer uses an older version of Windows, both will need to use an earlier tool called Windows Remote Assistance instead.
2. Quick Assist is not a "set it and forget it" remote desktop tool. The person who needs assistance with their Windows 10 computer must be sitting in front of it -- at least initially, to grant permission for it to be connected and controlled by the computer of the person who will help them. In fact, we recommend that both parties be present at all times. Because the person providing assistance will have full access to the other computer and everything on it, a great deal of trust is involved; it can be more comfortable for both parties if that computer is never left unattended.3. Quick Assist works better if each Windows 10 computer has fast and reliable internet access. If you're the one controlling the other computer remotely, a flaky or slow connection can result in sluggish performance. For example, if you click to close an application window on the other computer, it may take several seconds to see this happening on your computer's screen.
Generally speaking, if you and the other person can hold a video chat session, such as through Skype, and the image and sound quality is good (especially at your end), then the connection your computers share is probably suitable for Quick Assist.
4. Quick Assist won't stream sound from the remote computer. This shouldn't matter, unless you're trying to fix an audio issue with the other computer.
Make the connection
Assuming that you will be the one who will control the other person's Windows 10 computer over the internet, here's how to get connected:
1. Launch the Quick Assist tool. It's listed under the Windows Accessories folder -- or just search the Start menu for "Quick Assist."
2. In the Quick Assist window that appears, click Give Assistance.
To help another Windows 10 user remotely, launch the Quick Assist app and choose Give Assistance. 3. Sign in with your Microsoft Online account. No longer required
4. Quick Assist generates a 6-digit security code. Give this code (by email, instant messenger, text or voice call) to the person whose computer you will need to connect to. After 10 minutes, this code will become invalid.
When you start a Quick Assist session, a 6-digit security code is generated for the person you are supporting to enter on their computer. 5. At the other end, the person who needs your help with their Windows 10 PC needs to launch the Quick Assist tool on their computer and click Get Assistance. Then they enter the 6-digit security code you gave them, and click Submit.
6. Next, they will be presented with a "Share your screen" permissions window, where they will need to click Allow.
The person you are assisting must give you permission to access their PC.
What you see, what they see
After a few seconds or more (this depends on the connection speed between the computers), Quick Assist will display the Windows 10 desktop of the other person's computer inside an application window, which will be bordered with a yellow frame.
When you're assisting someone else, you'll see their Windows 10 desktop inside a yellow frame. As with any other Windows desktop application, you can minimize this application window, maximize it to full-screen, move it around your desktop, or resize it by dragging its sides or corners. However, the desktop of the other person's computer always appears inside this application window; there's no option that lets you enlarge it to fill your own computer's screen.
To interact with the other computer, move your mouse pointer over the image of the other computer's Windows 10 desktop, and then just use your computer's keyboard and mouse (or touchpad) as you normally would when using your own computer.
From the point of view of the other computer, the person sitting in front of it will see that their Windows 10 desktop is framed by a yellow border. They will see the mouse pointer move as you control it from your computer, and they will also see the text and other characters you type from your computer's keyboard.
The person you're assisting will see their own desktop inside a yellow frame. As you move your mouse or enter text, they will see those actions on their desktop. They can still use their own computer's keyboard and mouse or touchpad, which will interfere with your actions if you're both doing this at the same time. If you plan to use Quick Assist to teach the other person how to do something on their computer -- for example, you perform an action remotely on their desktop, then watch as they repeat your action -- it's best to be on a phone call together so you can not only explain what you're doing, but also let them know when it's their turn to take control of their computer. (I wouldn't advise using Skype or another video streaming connection via the computers, because it sucks up bandwidth and could slow down Quick Assist.)
The person sitting in front of the other computer can temporarily pause your control over their computer at any time by clicking the "pause" icon next to "Screen sharing on" in the menu that appears at the top-center of their screen. When they click to pause, the yellow border framing their Windows 10 desktop turns gray. The pause icon will change to a triangle "play" icon, which they click when they want you to resume control over their computer.
The person at the remote computer can pause or end screen sharing at any time. They can also revoke your remote control of their computer by clicking the "X" next to "Quick Assist." This completely ends the session.
Q.Can anyone using the computer see the past activities listed in the Windows 10 Timelime?
A.The Timeline feature included with the Windows 10 April 2018 Update is meant to enhance your productivity by storing a record of the files you used, sites you browsed and other actions you made on your computer. Can’t remember where you stored a document or want to return to a particular website quickly? You can click the Timeline icon in the Windows 10 task bar to see a visual log organized by date, and jump back to what you need by clicking the appropriate preview icon.
If Timeline is enabled, some of your PC activity — like files you edit in Microsoft Office — can also sync with your mobile device or another computer you use. And the tool works with the Cortana virtual assistant and its “pick up where you left off” function, which restores your work space on command.
The activity data is recorded based on the Microsoft account, so if you share both the computer and the same user account, the Timeline records are visible to all involved. To keep your travels private, create a separate account for one of you to use. If you’d generally like to keep your activity private and do not want Windows 10 tracking it, you can turn off the Timeline feature, hide it or edit it.
Press the Windows and I keys to open the Settings box (or click the gear-shaped Settings icon in the Start Menu) and select the Privacy icon. On the left side of the Privacy box, select Activity History and turn off the box next to “Let Windows collect my activities from this PC” on the right side. If your computer was set to sync your activities with other devices online, also disable “Let Windows sync my activities from this PC to the cloud.”
If you eventually get separate accounts on the computer and one of you wants to use the Timeline feature, enable the data collection option in the Activity History controls again. In the “Show activities from accounts” area of the Settings box, flip on the switch next to the account wishing to use Timeline. Within the Activity History settings box, you can also wipe your activity history. To remove activities directly from the Timeline screen, right-click the thumbnail preview and choose the Remove or Clear option.
For those who find the feature useful and wish to use it, pressing the Windows and Tab keys opens the Timeline from the keyboard. You can also open Timeline by clicking its Taskbar icon next to the Cortana search box. Don’t see the Timeline icon? Right-click the Taskbar and choose “Show Task View Button.”
A. For years, Mac computers did not come with utilities like Disk Cleanup and the newer Storage Sense found in Windows, but Apple added new tools in 2016 with the release of its macOS Sierra
system. If your Mac is running at least that version of the system, go
to the Apple Menu, select About This Mac and click the Storage tab.
On
the Storage screen, you should see a graphic showing your drive’s
available space. Click the Manage button on the right side of the box to
get started. The resulting storage-management screen offers four ways to clear off old files: Store in iCloud, Optimize Storage, Empty Trash Automatically and Reduce Clutter.
As one might expect, the Store in iCloud option punts documents, photos and Messages off your Mac’s drive and into your iCloud online storage locker. While this does free up room on the computer, you may have to buy more iCloud storage space from Apple if you fill up your five gigabytes that come free with an iCloud account.
You just have to find one jumper which is normally under hard drive. This works at least with Dell Optiplex 6xx and 7xx series.
Jumper is normally marked with text “PSWD” and it’s pretty easy to find because it’s probably blue/green when other jumpers are black and smaller.
First of all shutdown your computer and unplug power supply cable from back of your computer.
Open the case and you should see hard drive. Remove it (no need to unplug cables) and you should see “PSWD” labeled jumper under the hard drive.
Remove the jumper and plug power cord back to computer and turn on the computer. You should soon see “password” removed” text on the screen.
Power off your computer and unplug power cord again. Now you just need to put jumper back where you removed it and put hard drive back and close the cover.
Plug power supply cable again back and turn on your computer. If you hit F2 right away when you see text on the screen you should access the BIOS menu and you should notice that password is gone now and you can access everything on BIOS and you can even change password if you want (no need to do that).