To set up a PuTTY SSH connection, you must download the following:
- The private key file generated by the Sierra Administrative Application. Sierra provides the private key in the OpenSSH file format.
- The PuTTY SSH client program (putty.exe)
- The PuTTYgen utility (puttygen.exe), which is used for converting the Sierra private key file into PuTTY's own private key file format
First go into Sierra admin module, download Private Key File

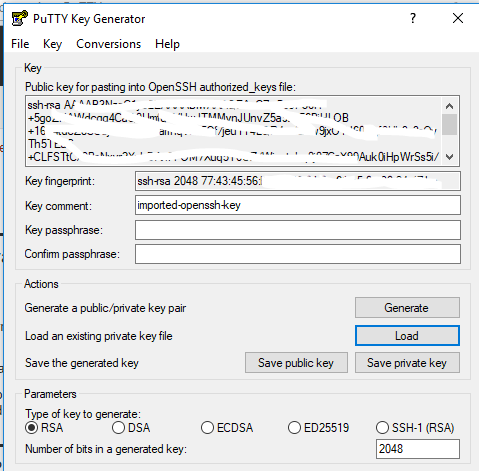
PuTTY stores SSH private key files in the .ppk file format. To convert the OpenSSH private key file provided by the Sierra Administrative Application into a .ppk file, do the following:
- Start the PuTTYgen key generation utility.
- Click the Load button to load an existing private key file.
- In the Load Private Key dialog box that opens, locate the drop-down selector in the lower right corner that provides file search options. Change the selection to "All Files (*)", and navigate to the directory containing the private key file downloaded in step 2. Click the Open button.
- Click OK when prompted with the message "Successfully imported foreign key ....To use this key with PuTTY, you need to use the 'Save private key' command'."
- Confirm that "RSA" is selected. You can find this option on PuTTYgen's main window at the bottom in the Parameters: Type of key to generate section. For the Number of bits in a generated key value, use the default of "2048".
- Click Save private key.
- Click Yes when PuTTYgen displays a warning window with the question "Are you sure you want to save this key without a passphrase to protect it?".
- From the Save private key as dialog box, select the name of the PuTTY private key file, the location at which you want to store the file, and the file type. Use the file type "PuTTY Private Key Files (*.ppk)" when saving the PuTTY private key.
You can save your PuTTY configuration settings for Admin Corner access for future use. To save your configuration, do the following:
- Start the PuTTY client program.
- Configure the settings on the Session panel.
- Click the Session option in the Category pane on the left-hand side of the screen.
- In the Host Name (or IP address) field, enter your Sierra app server host name or IP address.
- In the Port field, enter "22".
- In the Connection type section, select "SSH".
- Configure the settings on the Data panel.
- Click the Connection | Data option in the Category pane on the left-hand side of the screen.
- In the Auto-login username field, enter "-------" with no quotation marks.[see documentation]
- Configure the settings on the Auth panel.
- Click the Connection | SSH | Auth option in the Category pane on the left-hand side of the screen.
- Click the Browse button under the text "Private Key file for authentication".
- Navigate to the directory where you saved the PuTTY-generated private key file (*.ppk), select the file, and click Open.
- Save your session configuration for Sierra Admin Corner on the Session panel
- Click the Session option in the Category pane on the left-hand side of the screen.
- In the blank field under the text Saved Sessions, enter a name for your Sierra Admin Corner session.
- Click Save
From Sierra Documentation