Had to setup an Epson T88v printer:
Getting initial
printer and
Ethernet adapter settings (Type IV)
Get the initial settings of the Ethernet adapter. Run the printer self test (hold down the feed button while turning on the printer). The printer will print a list of initial settings including interface type and buffer capacity. verify that the interface is "Ethernet"
Get the initial settings of the Ethernet adapter. Run the printer self test (hold down the feed button while turning on the printer). The printer will print a list of initial settings including interface type and buffer capacity. verify that the interface is "Ethernet"
A similar test can then be done on the UB-E03, UB-E04 adapter by inserting a paperclip through the small hole in the
adapter for 3 seconds.
A strip will print showing the MAC
address, Gateway (GW), IP address and IP assignment method (manual/auto).
Changing the IP Address of the
Adapter
Now comes the tricky part. To be able to change the IP address on the adapter you need to be able to connect with it. To do this you most likely need to change the IP address of your computer to a value that makes the adapter accessible. You can then connect to the adapter, make the change to the adapter, then return the computer back to it's original settings.
Now comes the tricky part. To be able to change the IP address on the adapter you need to be able to connect with it. To do this you most likely need to change the IP address of your computer to a value that makes the adapter accessible. You can then connect to the adapter, make the change to the adapter, then return the computer back to it's original settings.
| Note: the mPOS version of the UB-E03, UB-E04 Ethernet cards
are set to DHCP and will try to find an available IP address on its own the first
time it appears on your network. If successful, it will print out the IP
address it is using. If the address is acceptable to you then skip to
section about Configuring the
Computer for work with the Ethernet card.
LOGIN INFORMATION - Epson UB-E04 Cards also
require you to enter a user name and password. The default values are epson / epson |
Resetting the Adapter
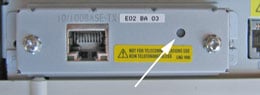
You can reset the UB-E03, UB-E04 Ethernet Interface card to factory defaults by holding down the push button on the card (see arrow above) while turning on the printer power and continuing to hold it down for 5 seconds. This causes all internal settings to return to their factory defaults. For the older UB-E02 cards, hold the push button down after the printer is on for 30 seconds.
You can reset the UB-E03, UB-E04 Ethernet Interface card to factory defaults by holding down the push button on the card (see arrow above) while turning on the printer power and continuing to hold it down for 5 seconds. This causes all internal settings to return to their factory defaults. For the older UB-E02 cards, hold the push button down after the printer is on for 30 seconds.
Setting the IP Address on your
Computer
In Windows you can access the wired Ethernet adapter in the "Network Connections" applet in the Windows Control Panels (Internet Protocol/TCP/IP properties, allow you to enter an IP address.) Make a note of the existing settings, you'll be returning to those settings when your done. Set the IP address to an address in the same domain as the adapter. For example of the adapter shows an IP address of 172.16.10.63 you could change the computer to 172.16.10.2. Do not set the computer to the same address as the Ethernet adapter on the printer. You might have to reset the computer's adapter for the new settings to take place.
In Windows you can access the wired Ethernet adapter in the "Network Connections" applet in the Windows Control Panels (Internet Protocol/TCP/IP properties, allow you to enter an IP address.) Make a note of the existing settings, you'll be returning to those settings when your done. Set the IP address to an address in the same domain as the adapter. For example of the adapter shows an IP address of 172.16.10.63 you could change the computer to 172.16.10.2. Do not set the computer to the same address as the Ethernet adapter on the printer. You might have to reset the computer's adapter for the new settings to take place.
Logging onto the Adapter using
TMNet WebConfig (Type II or Type
IV)
TMNet web configuration allows you to access the adapter via your network using a web browser. Generally speaking the adapter must be in the same sub domain as the computer to be able to log on (see previous section for how to configure the PC to the same subdomain)
TMNet web configuration allows you to access the adapter via your network using a web browser. Generally speaking the adapter must be in the same sub domain as the computer to be able to log on (see previous section for how to configure the PC to the same subdomain)
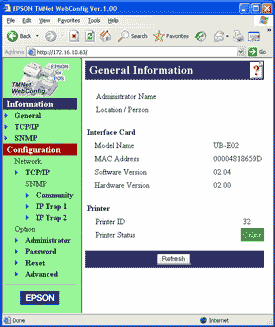 |
Using a web browser such as Internet Explorer you should now be able to connect to the adapter by entering the IP address of the adapter directly into the address bar of the browser. The TMNet General Information page show open. |
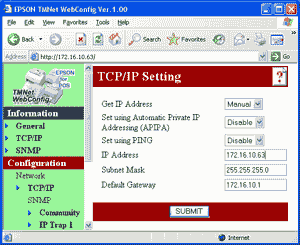 |
To change the IP address, select 'TCP/IP' under 'Configuration.' You can enter a new IP address and gateway address. Press the 'Submit' button when done |
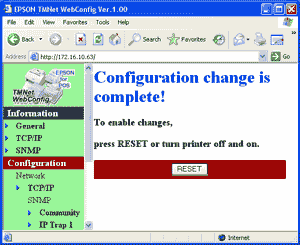 |
The 'Submit' button with write settings to the printer. The Ethernet adapter is reset when you press the 'Reset' button. |
From https://www.beaglehardware.com/
No comments:
Post a Comment