Navigation

Showing posts with label printer. Show all posts

8/14/2019

Epson t88v receipt printer network setup


Had to setup an Epson T88v printer:


Getting initial printer and Ethernet adapter settings (Type IV)
Get the initial settings of the Ethernet adapter. Run the printer self test (hold down the feed button while turning on the printer). The printer will print a list of initial settings including interface type and buffer capacity. verify that the interface is "Ethernet"
A similar test can then be done on the UB-E03, UB-E04 adapter by inserting a paperclip through the small hole in the adapter for 3 seconds.
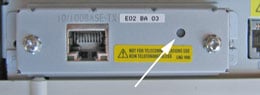
A strip will print showing the MAC address, Gateway (GW), IP address and IP assignment method (manual/auto).
Changing the IP Address of the Adapter
Now comes the tricky part. To be able to change the IP address on the adapter you need to be able to connect with it. To do this you most likely need to change the IP address of your computer to a value that makes the adapter accessible. You can then connect to the adapter, make the change to the adapter, then return the computer back to it's original settings.
Note: the mPOS version of the UB-E03, UB-E04 Ethernet cards are set to DHCP and will try to find an available IP address on its own the first time it appears on your network. If successful, it will print out the IP address it is using. If the address is acceptable to you then skip to section about Configuring the Computer for work with the Ethernet card. LOGIN INFORMATION  - Epson UB-E04 Cards also require you to enter a user name and password.
The default values are epson / epson
Resetting the Adapter
You can reset the UB-E03, UB-E04 Ethernet Interface card to factory defaults by holding down the push button on the card (see arrow above) while turning on the printer power and continuing to hold it down for 5 seconds. This causes all internal settings to return to their factory defaults. For the older UB-E02 cards, hold the push button down after the printer is on for 30 seconds.
Setting the IP Address on your Computer
In Windows you can access the wired Ethernet adapter in the "Network Connections" applet in the Windows Control Panels (Internet Protocol/TCP/IP properties, allow you to enter an IP address.) Make a note of the existing settings, you'll be returning to those settings when your done. Set the IP address to an address in the same domain as the adapter. For example of the adapter shows an IP address of 172.16.10.63 you could change the computer to 172.16.10.2.  Do not set the computer to the same address as the Ethernet adapter on the printer. You might have to reset the computer's adapter for the new settings to take place.
Logging onto the Adapter using TMNet WebConfig (Type II or Type IV)
TMNet web configuration allows you to access the adapter via your network using a web browser. Generally speaking the adapter must be in the same sub domain as the computer to be able to log on (see previous section for how to configure the PC to the same subdomain)
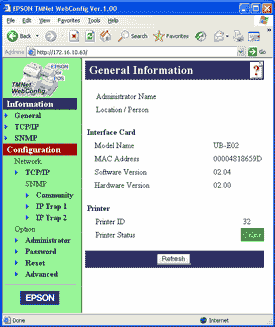
Using a web browser such as Internet Explorer you should now be able to connect to the adapter by entering the IP address of the adapter directly into the address bar of the browser. The TMNet General Information page show open.
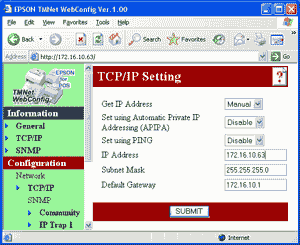
To change the IP address, select 'TCP/IP' under 'Configuration.' You can enter a new IP address and gateway address. Press the 'Submit' button when done
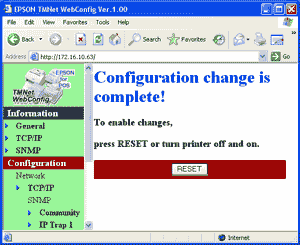
The 'Submit' button with write settings to the printer. The Ethernet adapter is reset when you press the 'Reset' button.


From  https://www.beaglehardware.com/


8/07/2019

HP universal printer driver: switch to color


Had patron with color printer & using HP universal printer driver, but only printed grayscale, no color, to fix:

  • Right click the start icon and select Run.
  • Type control and press OK.
  • Open Devices and Printers.
  • Right click the HP Universal Printing iocn and select Printer Properties.
  • Open the Device Settings tab.
  • Ensure the Device Type is set as Color rather than Auto Detect, confirm any changes by pressing OK.

HP solution forms

1/29/2016

Maintenance kit service for HP 600 laserjet

Video to change fuser, transfer roller on HP 600 laserjet;


How To Reset the Maintenance Count on the M600, M601, M602, M603 series
1. Press the Home button on the printer's control panel.
2. Open the "Administration" menu.
3. Select "Manage Supplies".
4. Select "Reset Supplies".
5. Select "New Maintenance Kit".
6. Select "Yes" to reset the maintenance kit counter.


6/14/2013

HP LaserJet 9050 Cold Reset

To erase admin password or reset maintenance kit count on HP 9050:

Turn on 9050,  wait until it starts the memory check,  then Press and hold the select button (check) while it is counting the MB of memory.
Then press down when the menu selections shows until you see the Cold Reset option. 

From printer techs


6/06/2013

Installing printer via BAT file - Windows 7 - All users

Want to install printer via .BAT script, not Active Directory or group policy:

From http://technet.microsoft.com/en-us/library/ee624057(WS.10).aspx


Printui.dll is the executable file that contains the functions used by the printer configuration dialog boxes. These functions can also be called from within a script or a command-line batch file, or they can be run interactively from the command prompt.

Base Parameters Description
/dl Deletes the local printer.
/dn Deletes a network printer connection.
/dd Deletes a printer driver.
/e Displays the printing preferences for a given printer.
/ga Adds a per computer printer connection
(the connection is available to any user on that computer when they log on).
/ge Displays per computer printer connections on a computer.
/gd Deletes a per computer printer connection
(the connection is deleted the next time a user logs on).
/ia Installs a printer driver by using an .inf file.
/id Installs a printer driver by using the Add Printer Driver Wizard.
/if Installs a printer by using an .inf file.
/ii Installs a printer by using the Add Printer wizard with an .inf file.
/il Installs a printer by using the Add Printer wizard.
/in Connects to a remote network printer.
/ip Installs a printer by using the Network Printer Installation Wizard
(available from the user interface from Print Management).
/k Prints a test page on a printer.
/o Displays the queue for a printer.
/p Displays the properties of a printer. When you use this parameter, you must also specify a value for the modification parameter /n[name].
/s Displays the properties of a print server. If you want to view the local print server, you do not need to use a modification parameter. However, if you want to view a remote print server, you must specify the /c[name] modification parameter.
/Ss Specifies what type of information for a printer will be stored. If none of the values for /Ss are specified, the default behavior is as if all of them were specified. Use this base parameter with the following values placed at the end of the command line:
  • 2: Use to store the information contained in the printer’s PRINTER_INFO_2 structure. This structure contains the basic information about the printer such as its name, server name, port name, and share name.
  • 7: Use to store the directory service information contained in the PRINTER_INFO_7 structure.
  • c: Use to store the color profile information for a printer.
  • d: Use to store printer specific data such as the printer’s hardware ID.
  • s: Use to store the printer’s security descriptor.
  • g: Use to store the information in the printer’s global DEVMODE structure.
  • m: Use to store the minimal settings for the printer. This is equivalent to specifying 2, d, and g.
  • u: Use to store the information in the printer’s per user DEVMODE structure.
/Sr Specifies what information about a printer is restored and how conflicts in settings are handled. Use with the following values placed at the end of the command line:
  • 2: Use to restore the information contained in the printer’s PRINTER_INFO_2 structure. This structure contains the basic information about the printer such as its name, server name, port name, and share name.
  • 7: Use to restore the directory service information contained in the PRINTER_INFO_7 structure.
  • c: Use to restore the color profile information for a printer.
  • d: Use to restore printer specific data, such as the printer’s hardware ID.
  • s: Use to restore the printer’s security descriptor.
  • g: Use to restore the information in the printer’s global DEVMODE structure.
  • m: Use to restore the minimal settings for the printer. This is equivalent to specifying 2, d, and g.
  • u Use to restore the information in the printer’s per user DEVMODE structure.
  • r: If the printer name stored in the file is different from the name of the printer being restored to, then use the current printer name. This cannot be specified with f. If neither r nor f is specified and the names do not match, restoration of the settings fails.
  • f: If the printer name stored in the file is different from the name of the printer being restored to, then use the printer name in the file. This cannot be specified with r. If neither f nor r is specified and the names do not match, restoration of the settings fails.
  • p: If the port name in the file being restored from does not match the current port name of the printer being restored to, the printer’s current port name is used.
  • h: If the printer being restored to could not be shared using the resource share name in the saved settings file, then attempt to share the printer with either the current share name or a new generated share name. If neither H nor h is specified and the printer being restored to cannot be shared with the saved share name, then restoration fails.
  • h: If the printer being restored to cannot be shared with the saved share name, then do not share the printer. If neither H nor h is specified and the printer being restored to cannot be shared with the saved share name, then restoration fails.
  • i: If the driver in the saved settings file does not match the driver for the printer being restored to, then the restoration fails.
/Xg Retrieves the settings for a printer.
/Xs Sets the settings for a printer.
/y Sets the printer being installed as the default printer.
/? Displays the in-product Help for the command and its associated parameters.
@[file] Specifies a command-line argument file and directly inserts the text in that file into the command line.


To add a new remote printer, Printer1, for a computer, Client1, which is visible for the user account where this command is run, type:
rundll32 printui.dll PrintUIEntry /in /n\\client1\printer1

To add a printer using the Add Printer wizard and using an .inf file, InfFile.inf, located on drive c: at InfPath, type:
rundll32 printui.dll PrintUIEntry /ii /f c:\InfPath\InfFile.inf

To delete an existing printer, Printer1, on a computer, Client1, type:
rundll32 printui.dll PrintUIEntry /dn /n\\client1\printer1

To add a per computer printer connection, Printer2, for all users of a computer, Client2, type (the connection will be applied when a user logs on):
rundll32 printui.dll PrintUIEntry /ga /n\\client2\printer2

To delete a per computer printer connection, Printer2, for all users of a computer, Client2, type (the connection will be deleted when a user logs on):
rundll32 printui.dll PrintUIEntry /gd /n\\client2\printer2

To view the properties of the print server, PrintServer1, type:
rundll32 printui.dll PrintUIEntry /s /t1 /c\\printserver1

11/06/2012

HP 4200 Laserjet - Installing fuser

Here is a video on installing maintenance kit and fuser in an HP 4200 printer:


Nov 2012: install fuser in circ printer (HP 4200), last one only looked like it lasted 13000 pages, not 200000 that they should last

Got replacement fuser from http://www.usaprinterguy.com/  nice step by step instruction sheet, new rollers, free return shipping for old fuser, good price.

8/07/2012