Navigation

Showing posts with label Windows. Show all posts

11/11/2020

converting .zoom files

Normally, when a Zoom meeting finishes, if you have elected to record the meeting on your computer, then it will automatically convert to an .mp4 file that you can view. Sometimes this process can fail and instead of an .mp4 file, you will see a file titled “double_click_to_convert_**.zoom”.

If the icon for the file is white and it does not convert when you double-click the file, these steps will help you resume the failed conversion and get access to the .mp4 file so you can post it to YouTube or otherwise make it available to your students.

Right-click the ‘double_click_to_convert_**.zoom’ file and select ‘open with’.

Click ‘more apps’.

Scroll down to ‘Look for another app on this PC’ and click it.

Browse to: C:\Users\*YOURACCOUNTNAME*\AppData\Roaming\Zoom\bin and select zTscoder.exe and click ‘open’.

Double-click the ‘double_click_to_convert_**.zoom’ file and it will begin converting.


From Hollins.edu

10/16/2020

What Is the Difference Between CHKDSK, SFC, and DISM?

 Difference between CHKDSK, SFC, and DISM


When You Should Use CHKDSK

CHKDSK (Check Disk) is the first Windows diagnostic tool you should try if your PC starts acting strangely. For example, if it hangs while shutting down or becomes frustratingly slow.

CHKDSK scans your entire hard drive to find and fix errors in files and the file system itself. It also checks your drive for bad sectors (clusters of data that cannot be read) and either tries to repair them or tells your system not to use them.

Windows may run CHKDSK on startup if it detects a problem with your hard drive, sometimes for innocuous reasons such as improper shutdown, but also more serious ones including malware infection and impending drive failure. However, it won’t actually fix any issues until instructed to do so.

To prevent future errors and potential data loss, it’s worth running CHKDSK manually at least once a month as part of your PC maintenance routine. You can use one of the following methods:

1. Run CHKDSK through File Explorer

You can run CHKDSK from the command prompt. If you’re uncomfortable with using the Command Prompt, open File Explorer, click This PC, then right-click the drive you want to check and select Properties.

Select the Tools tab and then select Check in the Error checking section.

What Is the Difference Between CHKDSK, SFC, and DISM in Windows 10?

By Robert Irvine

Confused about CHKDSK, SFC, and DISM? We look at the three Windows diagnostic tools and explain how they work in different ways.

When your PC starts reporting errors, slowing down, or misbehaving, you can use Windows 10’s built-in diagnostic tools to try and fix the problem. CHKDSK, SFC, and DISM check the health of your hard drive and repair corrupt files, but the three tools work in different ways and target different areas of your system.

CHKDSK SFC DISM featured

CHKDSK, SFC, and DISM are system tools and you can run all three. But this can prove time-consuming and unnecessary for your specific problem. We’ll explain when and how to use this trio of troubleshooting tools.

When You Should Use CHKDSK

CHKDSK (Check Disk) is the first Windows diagnostic tool you should try if your PC starts acting strangely. For example, if it hangs while shutting down or becomes frustratingly slow.

CHKDSK scans your entire hard drive to find and fix errors in files and the file system itself. It also checks your drive for bad sectors (clusters of data that cannot be read) and either tries to repair them or tells your system not to use them.

Windows may run CHKDSK on startup if it detects a problem with your hard drive, sometimes for innocuous reasons such as improper shutdown, but also more serious ones including malware infection and impending drive failure. However, it won’t actually fix any issues until instructed to do so.

To prevent future errors and potential data loss, it’s worth running CHKDSK manually at least once a month as part of your PC maintenance routine. You can use one of the following methods:

1. Run CHKDSK through File Explorer

You can run CHKDSK from the command prompt. If you’re uncomfortable with using the Command Prompt, open File Explorer, click This PC, then right-click the drive you want to check and select Properties.

Select the Tools tab and then select Check in the Error checking section.

If Windows determines that everything is running smoothly, it will suggest that you don't need to scan the drive. To run CHKDSK anyway, select Scan drive.

The scan may take anything from a few minutes to half an hour, depending on the size and state of your drive. Once complete, CHKDSK will either tell you that no errors were found or if it does find any, it will suggest you fix them.

chkdsk-features-windows-10
7 Nifty CHKDSK Features to Use in Windows 10

CHKDSK ("check disk") is a Windows diagnostic tool that scans data drive volumes, verifies their integrity, and fixes errors when necessary. Here we highlight the improved CHKDSK features you can find in Windows 8 and 10.


When You Should Use SFC

Whereas CHKDSK finds and fixes errors in the file system of your hard drive, SFC (System File Checker) specifically scans and repairs Windows system files. If it detects that a file has been corrupted or modified, SFC automatically replaces that file with the correct version.

Knowing when to use SFC is usually more obvious than with CHKDSK, which depends on a hunch that your hard drive isn’t behaving correctly. If Windows programs are crashing, you’re getting error messages about missing DLL files, or you’re experiencing the dreaded Blue Screen of Death, then it’s definitely time to run SFC.

Open an elevated Command Prompt, by running the tool as an administrator. Then type the following and press Enter:

sfc /scannow

SFC will perform a full scan of your system and repair and replace any files that are damaged or missing, using versions from the Windows component store. The scan can take some time, but make sure you leave the Command Prompt window open until it’s complete.

If you only want to scan but not repair corrupted system files, type:

sfc /verifyonly command

Once SFC has finished scanning, you’ll see one of three messages:

  • Windows Resource Protection did not find any integrity violations. This means that whatever’s causing your PC problems isn’t related to a system file.
  •  Windows Resource Protection found corrupt files and successfully repaired them. This should hopefully mean that your problems have been solved.
  • Windows Resource Protection found corrupt files but was unable to fix some of them. This means that system files are to blame, but SFC can’t replace them. Try running the tool again in Safe Mode. If you still get the same result, don’t despair: it’s time to use DISM.
SFC scan for corrupt files

When You Should Use DISM

DISM (Deployment Image Servicing and Management) is the most powerful of the three Windows diagnostic tools. Although you shouldn’t usually need to use the tools, it’s the one to turn to when you’re experiencing frequent crashes, freezes, and errors, but SFC either can’t repair your system files or is unable to run at all.

While CHKDSK scans your hard drive and SFC your system files. DISM detects and fixes corrupt files in the component store of the Windows system image so that SFC can work properly. Create a backup of your drive partition before running DISM, just in case something goes wrong.

As with CHKDSK and SFC, you’ll need to open an elevated Command Prompt to run DISM. To save you the time and risk of performing repairs unnecessarily, you can first check if the image is corrupted without making any changes. Type the following command and press Enter:

Dism /Online /Cleanup-Image /CheckHealth
 
The scan should only take a few seconds. If no corruption is detected, you can run a more advanced scan to determine if the component store is healthy and repairable, again without making any changes, by typing:
Dism /Online /Cleanup-Image /ScanHealth
If DISM reports that there are problems with the system image, run another advanced scan to repair these issues automatically. DISM will connect to Windows Update to download and replace damaged files as required. Note that the process may take up to 10 minutes and hang for a while at 20 seconds, but this is normal. Type this command: 
Dism /Online /Cleanup-Image /RestoreHealth 
Once the scan and repairs are complete, restart your PC and run SFC again to replace your corrupt or missing system files.

Fight Corruption and Win

Now that you understand what CHKDSK, SFC, and DISM do, running one or more of these Windows troubleshooting tools will hopefully help you fix your PC.

If you’re still having trouble, perform a System Restore. This will restore your system files, settings, and programs to a time when they were working properly. If your system wasn’t damaged when the restore point was created, may solve your corruption problems.


Makeuseof.com

5/01/2020

Clipboard History in Windows 10

You can now access your clipboard history in Windows 10:

To view your clipboard history, tap the Win+V keyboard shortcut. A little panel will open that will list all items, images and text, that you copied to your clipboard. Scroll through it and click an item you want to paste again.

If you look closely at the panel, you will see that each item has a little pin icon on it. Clicking it will exempt the item from being cleared when you clear your clipboard history. Speaking of which, you can clear your history by clicking the Clear all button on the clipboard history panel. You can also delete it from the Clipboard tab in the Settings app.


https://www.addictivetips.com/windows-tips/view-clipboard-history-on-windows-10/

4/27/2020

Quick Assist remote help


Windows 10 has a built in program, Quick Assist, to allow users to get remote help:


3/26/2020

Using Windows Remote Desktop on Chromebook

Had patron who wanted to access Windows PC from their Chrome OS laptop, in Google Play store there is Microsoft app


Use the Microsoft Remote Desktop app to connect to a remote PC or virtual apps and desktops made available by your admin. With Microsoft Remote Desktop, you can be productive no matter where you are.


Getting Started
+ Learn how to use Microsoft Remote Desktop at https://aka.ms/rdanddocs.
+ Learn about our other Remote Desktop clients at https://aka.ms/rdclients.
+ Submit feedback at https://aka.ms/rdandfbk.


Features
+ Access remote PCs running Windows Professional or Enterprise and Windows Server
+ Access remote resources published by your IT admin
+ Connect remotely through a Remote Desktop Gateway
+ Rich multi-touch experience supporting Windows gestures
+ Secure connection to your data and applications
+ Simple management of your connections from the Connection Center
+ High-quality video and audio streaming

10/16/2019

installing old XP drivers on Windows 10

Have an old printer that only has drivers for Windows XP, to install on Windows 10:


Windows 10 enforces driver signatures by default. This can be disabled to install drivers that are not digitally signed. Use the following steps to disable driver signature enforcement.
  1. Click the Start Start menu and select Settings.
  2. Click Update and Security.
  3. Click on Recovery.
  4. Click Restart now under Advanced Startup.
  5. Click Troubleshoot.
  6. Click Advanced options.
  7. Click Startup Settings.
  8. Click on Restart.
  9. On the Startup Settings screen press 7 or F7 to disable driver signature enforcement.
Your computer will restart and you will be able to install non-digitally signed drivers. If you restart your computer again the driver signature enforcement will be re-enabled.

From acer.com

10/02/2019

burn CD from ISO


In windows 10 you can simply right click an iso and select to burn it to a disk.
  1. Insert a blank CD or DVD in your writable optical drive.
  2. Right-click on the ISO file and select "Burn disk image."
  3. Select "Verify disc after burning" to make sure the ISO was burned without any errors.
  4. Click Burn


From superuser

9/24/2019

cleaning viruses from computer


There are two methods you can use to remove files from an infected drive. However, all of them involve cleaning the drive first before you begin copying files from the infection source onto a clean drive.
  1. Use an antivirus boot disk to scan and clean the drive before removing
  2. Remove the drive and attach to a second machine for cleaning and copying
You don’t want to start messing around with a malware infection, or worse, ransomware. You could, in theory, just start copying non-operating system files to a clean disk. However, as malware can attack and hide in a vast range of locations, why take the risk of reinfection after going through the effort of copying everything over?

1. Use an Antivirus Boot Disk to Clean Your Drive

An antivirus boot disk is a complete antivirus package that comes in the form of a Live CD/USB. A Live CD/USB is an environment you can boot into without using the host operating system. For instance, your infected machine might run Windows 10, but the antivirus boot disk doesn’t interact with Windows 10 in any way.
As the antivirus boot disk doesn’t interact with Windows or any other host operating system, it doesn’t trigger any malicious files. Whereas if you attempt to run an antivirus or antimalware suite from within the infected operating system, there is a chance the malware will fight back.

Download and Create Bitdefender Rescue

First up, you need to download and create the bootable antivirus disk on a known clean system. You cannot complete this process on the infected machine as it could corrupt the process. I’m using Bitdefender Rescue CD for this example.
Download: Bitdefender Rescue CD (ISO)
Next, you need to burn the rescue disc to a USB or CD. I’m going with a USB as that is what I have to hand, and I’ll use UNetbootin to burn the ISO to the USB.
Download: UNetbootin for Windows | macOS | Linux
Now:
  1. Fire up UNetbootin and insert the USB drive. Please note this process will completely wipe your USB flash drive, so back up any important data before proceeding.
  2. Select Diskimage, then browse to the Bitdefender Rescue ISO
  3. Select the USB flash drive you want to use, then press OK.
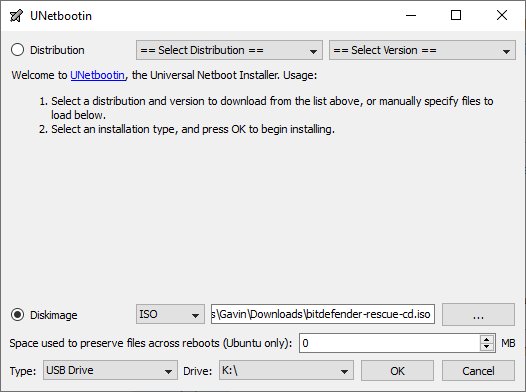
unetbootin select usb image

How to Scan and Clean Using Bitdefender Rescue

Once the process completes, insert the Bitdefender Rescue USB in the infected system. After you switch it on, press F11 or F12 to enter the boot menu. (The boot menu keys vary by machine.) Use the arrow key to select the USB drive and boot into the Bitdefender Rescue drive.
Select Start the Bitdefender Rescue CD in English and press Enter. You need to agree to the EULA. After agreeing, Bitdefender will automatically update, then begin scanning any local drives it finds. The Bitdefender scan automatically quarantines and removes malicious files.
At this point, I would run the scan again to make sure nothing flew under the radar.  After your scan confirms the drives you scan are clean, you can copy them onto another machine.

Other Linux Live Rescue Disks

A Linux Live USB/CD is very similar to the antivirus rescue disc. You are booting into an environment outside of your regular operating system, but you can still interact with your local files and folders. In this case, you can scan your local files before extracting them to a clean external system.
There are a huge number of them, many with competing or overlapping capabilities. If you want some more rescue disk options, check out the best rescue and recovery disks for a Windows system restore.

2. Remove the Drive for Cleaning

The second and less advisable option is to remove the drive from the infected system. Once removed, you can connect the drive to an alternative system to scan. In theory, so long as you have a strong antivirus or antimalware suite installed on the second machine and, most importantly, you don’t interact with or execute any file on the removed infected drive, you can scan it without causing an issue.
There are a few things you need to make this approach work.

Antivirus or Antimalware
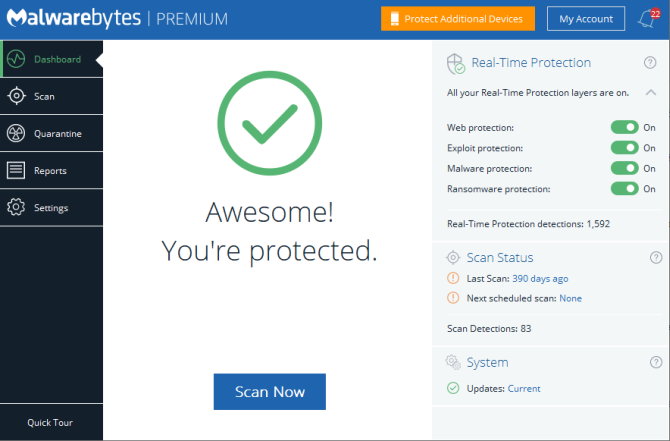
The first is a strong, up to date antivirus or antimalware suite. If you don’t already have premium protection, I would strongly suggest Malwarebytes Premium. Wondering if the Premium version is worth the expense? Here are five reasons you should upgrade to Malwarebytes Premium. In short; it’s worth it.

malwarebytes premium home

Sandbox

Next, I would also advise using a sandbox tool during the data transfer process. A sandbox creates a temporary environment within your operating system. If there is an issue with the data transfer, such as malware sparking into life, you can close the sandbox to remove everything inside. For that, Shadow Defender is an excellent option.
You can use Shadow Defender free for 30 days, which is ideal if you only have one system to transfer data from. Otherwise, a lifetime license will set you back around $35.
The idea with Shadow Defender is that you turn it on, creating a virtual restore point. From that moment, you can safely play with anything on your system because once you restart your system, Shadow Defender will wipe any system changes. In the event you trigger malware on the infected drive, the combination of antivirus/antimalware and reboot to restore sandbox tool will keep you safe.
There Shadow Defender alternatives available for both macOS and Linux:

Network Connection

The final thing to remember is to disconnect the clean machine from the internet before copying or scanning the malicious files. Any malware requiring a network connection will cease to function. However, before disconnecting from the internet, ensure you have up-to-date virus definitions, ready to capture any malicious activity.

Infected System Clean Checklist

So, to recap, you need to:
  1. Download, install and update an antimalware suite
  2. Download, install and update a sandbox tool
  3. Unplug your system from the network
Then you can plug in your potentially infected external drive, scan it, clean it, and hopefully free yourself from malware.

Keeping Your System Clean

The most difficult thing with a malware infection is understanding if the system is truly clean. You can scan a system with multiple antivirus and antimalware tools, and they still might miss something. I’m not trying to worry you. It is the truth of the matter.
Thankfully, most of us “only” run into common forms of malware. You should keep your eyes peeled for phishing attempts and other drive-by malware attacks, but these are all generic malware types. For the most part, only high-value targets need to worry about targeted malware attacks.
Want to know more about malware removal? Check out our guide to removing almost any type of malware.

Makeuseof.com

7/11/2019

Website shortcuts on taskbar

Want to create URL shortcuts on Windows 10 taskbar:


Step 1: Open the website you want to pin to your taskbar in Google Chrome.
Step 2: Click the three-dotted menu in the top right-hand corner.
Saving Link to Desktop on Chrome
Step 3: Click More Tools, followed by Create a shortcut.
Step 4: When the popup window appears, you can customize the name of the shortcut, and then choose Create. The shortcut should not automatically appear on your desktop.

Note for Macs: Chrome acts a little different on MacOS. Instead of using the Create a shortcut tool, you will need to instead choose Save page as…. Then, in the window that appears, make sure you are saving the link to your Desktop. This should add the shortcut to your desktop, no problem.

For other browsers:  https://www.digitaltrends.com/

12/12/2018

Windows 10 repair options, SFC and DISM


Using SFC and DISM for system repair

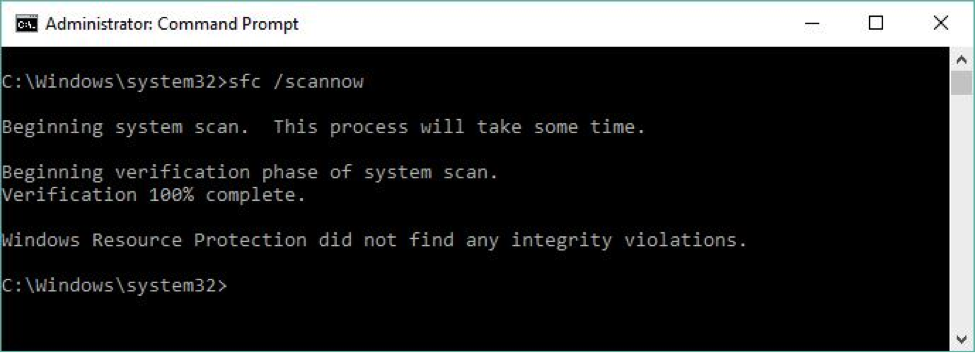
To quote TechNet, the system file checker "scans and verifies versions of all protected system files." It can tell you if it finds anything amiss if you enter SFC /scannow at the command line. You must run this utility from an Administrator: Command Prompt (press the Windows key-X combination), and then select Command Prompt (Admin) from the resulting pop-up menu. This command takes 5-10 minutes to complete, depending on your PC hardware. This command also attempts repairs if it finds anything that needs it. Figure 1 shows some sample output.
Figure 1: When SFC finds a damaged file it attempts to replace it with a good copy. Ed Tittel
Figure 1: When SFC finds a damaged file it attempts to replace it with a good copy.
If SFC determines that a protected file is damaged or changed, it grabs a correct version of the file from the C:\Windows\system32\dllcache folder and replaces it with a good copy. SFC can even attempt to repair that file cache if it finds changes or damage there, too. See the TechNet SFC reference for complete information on this command.
But as repair tools go, SFC is fairly lightweight. DISM is much more powerful and capable. DISM can often fix things that SFC can detect but that it cannot itself fix. DISM supports a raft of capabilities with switches and parameters to match, but basic system file repair syntax is reasonably easy (though it often requires multiple passes before it can set things straight). Here's some sample syntax (consult the TechNet DISM Technical Reference for all the gory details):
dism /online /cleanup-image /checkhealth
dism /online /cleanup-image /restorehealth [/Source: <source-info>]
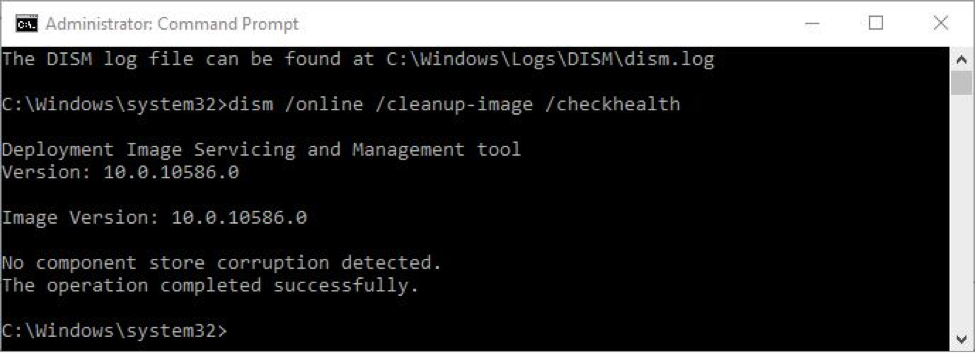
As with SFC, you must also run DISM in an Administrator: Command Prompt window. The /checkhealth command simply checks the running image (that's what /online tells it to do) to see if it can detect any damage or corruption. Because it's only checking file hashes and signatures, this command completes in under one minute on most machines. The good thing about /check is that it not only tells you if it finds damage but if that damage is repairable or non-repairable. If it's repairable, you can proceed to the /restorehealth option (covered in the next paragraph); if it's non-repairable, jump to Step 2.
Figure 2: Breathe a sigh of relief if DISM finds no corruption in the component store; otherwise try Ed Tittel
Figure 2: Breathe a sigh of relief if DISM finds no corruption in the component store; otherwise try the /restorehealth option.
The /restorehealth command can be tricky to use. Because it can actually repair the Windows image, it needs a source from which to attempt such repairs. You can omit the /source option, but if you do the command will try to grab its files from Windows Update over the Internet. This may or may not work, depending on firewall settings on your network. A safer bet is to point DISM at a known good source for Windows image components on the local machine (or on your local network). This can be a Windows image (.wim) file or a compressed Windows image (.esd, which is used for electronic software downloads of Windows installations, as the file extension is meant to communicate). You can also point to a copy of a WinSXS folder (the usual directory path is C:\Windows\WinSXS) taken from another PC with similar or identical hardware for which dism … /checkhealth returns a clean bill of health.


https://www.computerworld.com/article/3080839/microsoft-windows/your-step-by-step-guide-to-repairing-windows-10.html

11/17/2018

Error: PAGE FAULT IN NON PAGED AREA


From https://support.microsoft.com/
Check for updates
Many stop errors can be fixed by updating Windows. In the search box on the taskbar, type
Windows Update
, then select Windows Update. On the Windows Update page,
select Check for updates.
Update your drivers
Driver updates for Windows 10 and many devices are downloaded and installed through
Windows Update. To update or reinstall drivers, see the following support articles:
Update drivers in Windows 10 
Scan device performance and health
Windows Defender periodically scans your device for potential problems. To see the results
of the most recent scan, type “Windows Defender” on the search bar and select
Windows Defender Security Center. Select Device performance & health. If there are
problems with your device’s update history or drivers, they’re displayed here.
For more information, see the following support article: Track your device and
performance health in Windows Defender
.

9/26/2018

Checking lockout status on windows domain

To check if user is locked out of windows domain, there is freeware tool:

Account Lockout Status (LockoutStatus.exe) is a combination command-line and graphical tool that displays lockout information about a particular user account.


From Microsoft

9/24/2018

creating user via command line


To add local user account via command Line, that never expires and user can not change:


net user John thePassWord /ADD  /passwordchg:NO
 
WMIC USERACCOUNT WHERE "Name='John'" SET PasswordExpires=FALSE 


To add that user to Adminstrator group:

net localgroup "Administrators" John /add


https://www.lifewire.com/net-user-command-2618097 
 
https://serverfault.com/questions/434717/how-to-create-a-never-expiring-password-user-via-net-user-through-bat-file 


7/20/2018

reset Windows 7 administrator password

Have an old Win 7 laptop, forgot the administrator password,  Hiren's tools has a whole section on Passwords:

ATAPWD 1.2 Hard Disk Password Utility.
Autologon 3.01 Enables you to easily configure Windows' built-in autologon mechanism, so you don't have to wait on the login screen.
BIOS Master Password Generator Collection of password generator tools to reset BIOS Power on Password / Administrator password on Acer, Compaq, Dell, Fujitsu Siemens, Sony, Hewlett Packard, Phoenix, Samsung and other generic brand Laptops.
BulletsPassView 1.25 Reveal the passwords stored behind the bullet (asterisk) characters in Windows / IE (Updated Asterisk Logger).
ClearLock 1.4.0 Lock your desktop with a transparent layer, allowing you to see what is happening on your desktop and at the same time prevent access to the computer without the proper password.
Content Advisor Password Remover 1.01 It Removes Content Advisor Password from Internet Explorer.
Dialupass 3.16 Find and extract Username, Password, and Domain of DialUp/RAS/VPN networking in Windows.
Kon-Boot 1.0 Bypass Login Password of Windows (32bit, any password) and Linux login as kon-usr.
LicenseCrawler 1.11.239 Find the license keys and serial numbers of your programs.
Mail PassView 1.78 Recovers mail passwords of Outlook Express, MS Outlook, IncrediMail, Eudora, etc.
MessenPass 1.42 A password recovery tool that reveals the passwords of several instant messangers.
NTPWD Utility to reset windows nt/2000/xp administrator/user password.
NTPWEdit 0.3 Password editor for Windows NT based systems to change or remove passwords for local system accounts.
Offline NT Password Changer 2011-05-11 Utility to reset/unlock windows NT/2000/XP/Vista/7 administrator/user password.
Password Renew 1.1 Utility to set/reset windows NT/2000/XP/Vista/7 (32bit only) passwords.
ProduKey 1.54 Recovers lost the product key of your Windows/Office.
PST (Outlook) Password Recovery 1.16 PstPassword is a small utility that recovers lost password of Outlook .PST (Personal Folders) file.
Router IP/Passwords The complete list of Default Router Passwords and Default Router IP Addresses, can be useful if you have misplaced the manual or lost your router password.
SniffPass 1.13 A password monitoring tool that listens to your network, capture the passwords that pass through your network adapter, it works on POP3, IMAP4, SMTP, FTP, and HTTP protocols and recovers lost Web/FTP/Email passwords.
WebBrowserPassView 1.30 Allows you to view the user names and passwords stored by Mozilla Firefox, Opera, Safari, Google Chrome and Internet explorer Web browsers.
WindowsGate 1.1 Enables/Disables Windows logon password validation.
Windows Product Key Update Tool 1.7 This tool is from microsoft to change the key of illegal/pirated installed Xp to legit xp keys from the sticker on the PC, even if it is oem and not retail/corporate.
WirelessKeyView 1.56 Recovers all wireless network keys (WEP/WPA) stored in your computer by WZC Wireless Zero Configuration.
XP Key Reader 2.7 Can decode the XP-key on Local or Remote systems.