Navigation

12/19/2018

Windows Sandbox

Windows Sandbox is a new lightweight desktop environment tailored for safely running applications in isolation.

How many times have you downloaded an executable file, but were afraid to run it? Have you ever been in a situation which required a clean installation of Windows, but didn’t want to set up a virtual machine?

At Microsoft we regularly encounter these situations, so we developed Windows Sandbox: an isolated, temporary, desktop environment where you can run untrusted software without the fear of lasting impact to your PC. Any software installed in Windows Sandbox stays only in the sandbox and cannot affect your host. Once Windows Sandbox is closed, all the software with all its files and state are permanently deleted.

Windows Sandbox has the following properties:
  • Part of Windows – everything required for this feature ships with Windows 10 Pro and Enterprise. No need to download a VHD!
  • Pristine – every time Windows Sandbox runs, it’s as clean as a brand-new installation of Windows
  • Disposable – nothing persists on the device; everything is discarded after you close the application
  • Secure – uses hardware-based virtualization for kernel isolation, which relies on the Microsoft’s hypervisor to run a separate kernel which isolates Windows Sandbox from the host
  • Efficient – uses integrated kernel scheduler, smart memory management, and virtual GPU

Prerequisites for using the feature
  • Windows 10 Pro or Enterprise build 18305 or later
  • AMD64 architecture
  • Virtualization capabilities enabled in BIOS
  • At least 4GB of RAM (8GB recommended)
  • At least 1 GB of free disk space (SSD recommended)
  • At least 2 CPU cores (4 cores with hyperthreading recommended)

Quick start


  1. Install Windows 10 Pro or Enterprise, build 18305 or newer
  2. Enable virtualization:
    • If you are using a physical machine, ensure virtualization capabilities are enabled in the BIOS.
    • If you are using a virtual machine, enable nested virtualization with this PowerShell cmdlet:
    • Set-VMProcessor -VMName <VMName> -ExposeVirtualizationExtensions $true
  3. Open Windows Features, and then select Windows Sandbox. Select OK to install Windows Sandbox. You might be asked to restart the computer.
  4. Optional Windows Features dlg.png
  5. Using the Start menu, find Windows Sandbox, run it and allow the elevation
  6. Copy an executable file from the host
  7. Paste the executable file in the window of Windows Sandbox (on the Windows desktop)
  8. Run the executable in the Windows Sandbox; if it is an installer go ahead and install it
  9. Run the application and use it as you normally do
  10. When you’re done experimenting, you can simply close the Windows Sandbox application. All sandbox content will be discarded and permanently deleted

12/12/2018

Windows 10 repair options, SFC and DISM


Using SFC and DISM for system repair

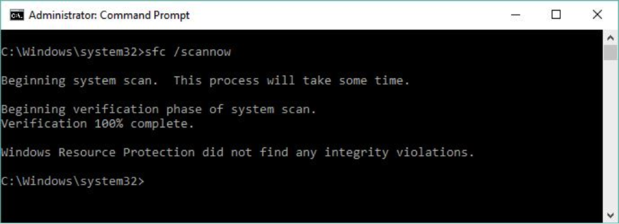
To quote TechNet, the system file checker "scans and verifies versions of all protected system files." It can tell you if it finds anything amiss if you enter SFC /scannow at the command line. You must run this utility from an Administrator: Command Prompt (press the Windows key-X combination), and then select Command Prompt (Admin) from the resulting pop-up menu. This command takes 5-10 minutes to complete, depending on your PC hardware. This command also attempts repairs if it finds anything that needs it. Figure 1 shows some sample output.
Figure 1: When SFC finds a damaged file it attempts to replace it with a good copy. Ed Tittel
Figure 1: When SFC finds a damaged file it attempts to replace it with a good copy.
If SFC determines that a protected file is damaged or changed, it grabs a correct version of the file from the C:\Windows\system32\dllcache folder and replaces it with a good copy. SFC can even attempt to repair that file cache if it finds changes or damage there, too. See the TechNet SFC reference for complete information on this command.
But as repair tools go, SFC is fairly lightweight. DISM is much more powerful and capable. DISM can often fix things that SFC can detect but that it cannot itself fix. DISM supports a raft of capabilities with switches and parameters to match, but basic system file repair syntax is reasonably easy (though it often requires multiple passes before it can set things straight). Here's some sample syntax (consult the TechNet DISM Technical Reference for all the gory details):
dism /online /cleanup-image /checkhealth
dism /online /cleanup-image /restorehealth [/Source: <source-info>]
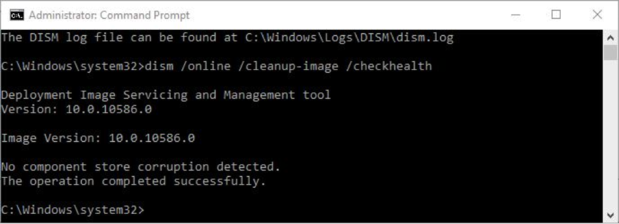
As with SFC, you must also run DISM in an Administrator: Command Prompt window. The /checkhealth command simply checks the running image (that's what /online tells it to do) to see if it can detect any damage or corruption. Because it's only checking file hashes and signatures, this command completes in under one minute on most machines. The good thing about /check is that it not only tells you if it finds damage but if that damage is repairable or non-repairable. If it's repairable, you can proceed to the /restorehealth option (covered in the next paragraph); if it's non-repairable, jump to Step 2.
Figure 2: Breathe a sigh of relief if DISM finds no corruption in the component store; otherwise try Ed Tittel
Figure 2: Breathe a sigh of relief if DISM finds no corruption in the component store; otherwise try the /restorehealth option.
The /restorehealth command can be tricky to use. Because it can actually repair the Windows image, it needs a source from which to attempt such repairs. You can omit the /source option, but if you do the command will try to grab its files from Windows Update over the Internet. This may or may not work, depending on firewall settings on your network. A safer bet is to point DISM at a known good source for Windows image components on the local machine (or on your local network). This can be a Windows image (.wim) file or a compressed Windows image (.esd, which is used for electronic software downloads of Windows installations, as the file extension is meant to communicate). You can also point to a copy of a WinSXS folder (the usual directory path is C:\Windows\WinSXS) taken from another PC with similar or identical hardware for which dism … /checkhealth returns a clean bill of health.


https://www.computerworld.com/article/3080839/microsoft-windows/your-step-by-step-guide-to-repairing-windows-10.html

12/09/2018

Gboard settings

Had a patron with a new Android phone, was a bit stumped on how to get to the settings to customize the virtual keyboard.
Gboard is turned off on the Android launcher by default, so you have to get it by tapping on the  ">" button  (left of the top bar), then clicking on the "gear icon" get to settings


  1. Access Gboard’s keyboard settings. Launch the Gboard app and tap "Keyboard Settings". A list of keyboard settings will appear.Image titled Edit Gboard Keyboard Settings Step 3 

  2. Toggle Glide Typing. Glide typing is a feature that allows you to type words by sliding your finger from key to key without lifting it away from the keyboard. This feature is unique to google keyboard and will not appear in the iOS settings.
    • The toggle will turn blue when it is on, gray color indicates that it is off.


    • Image titled Edit Gboard Keyboard Settings Step 4 
  3. Toggle Emoji Suggestions. This feature recommends emojis in along with word suggestions as you type (e.g. typing the word ‘happy’ will suggest a smiley face in place of the word).Image titled Edit Gboard Keyboard Settings Step 5 
  4. Toggle Auto-correction. This feature automatically changes misspelled words as you type. Keep an eye on names and places when this feature is turned on - they may not be recognized by the auto-correct dictionary and changed to something you don’t want.Image titled Edit Gboard Keyboard Settings Step 6
  5. Toggle Auto-capitalization. This will automatically capitalize words at the beginning of sentences as well as recognized proper nouns like names.  

m.wikihow.com/